はじめに
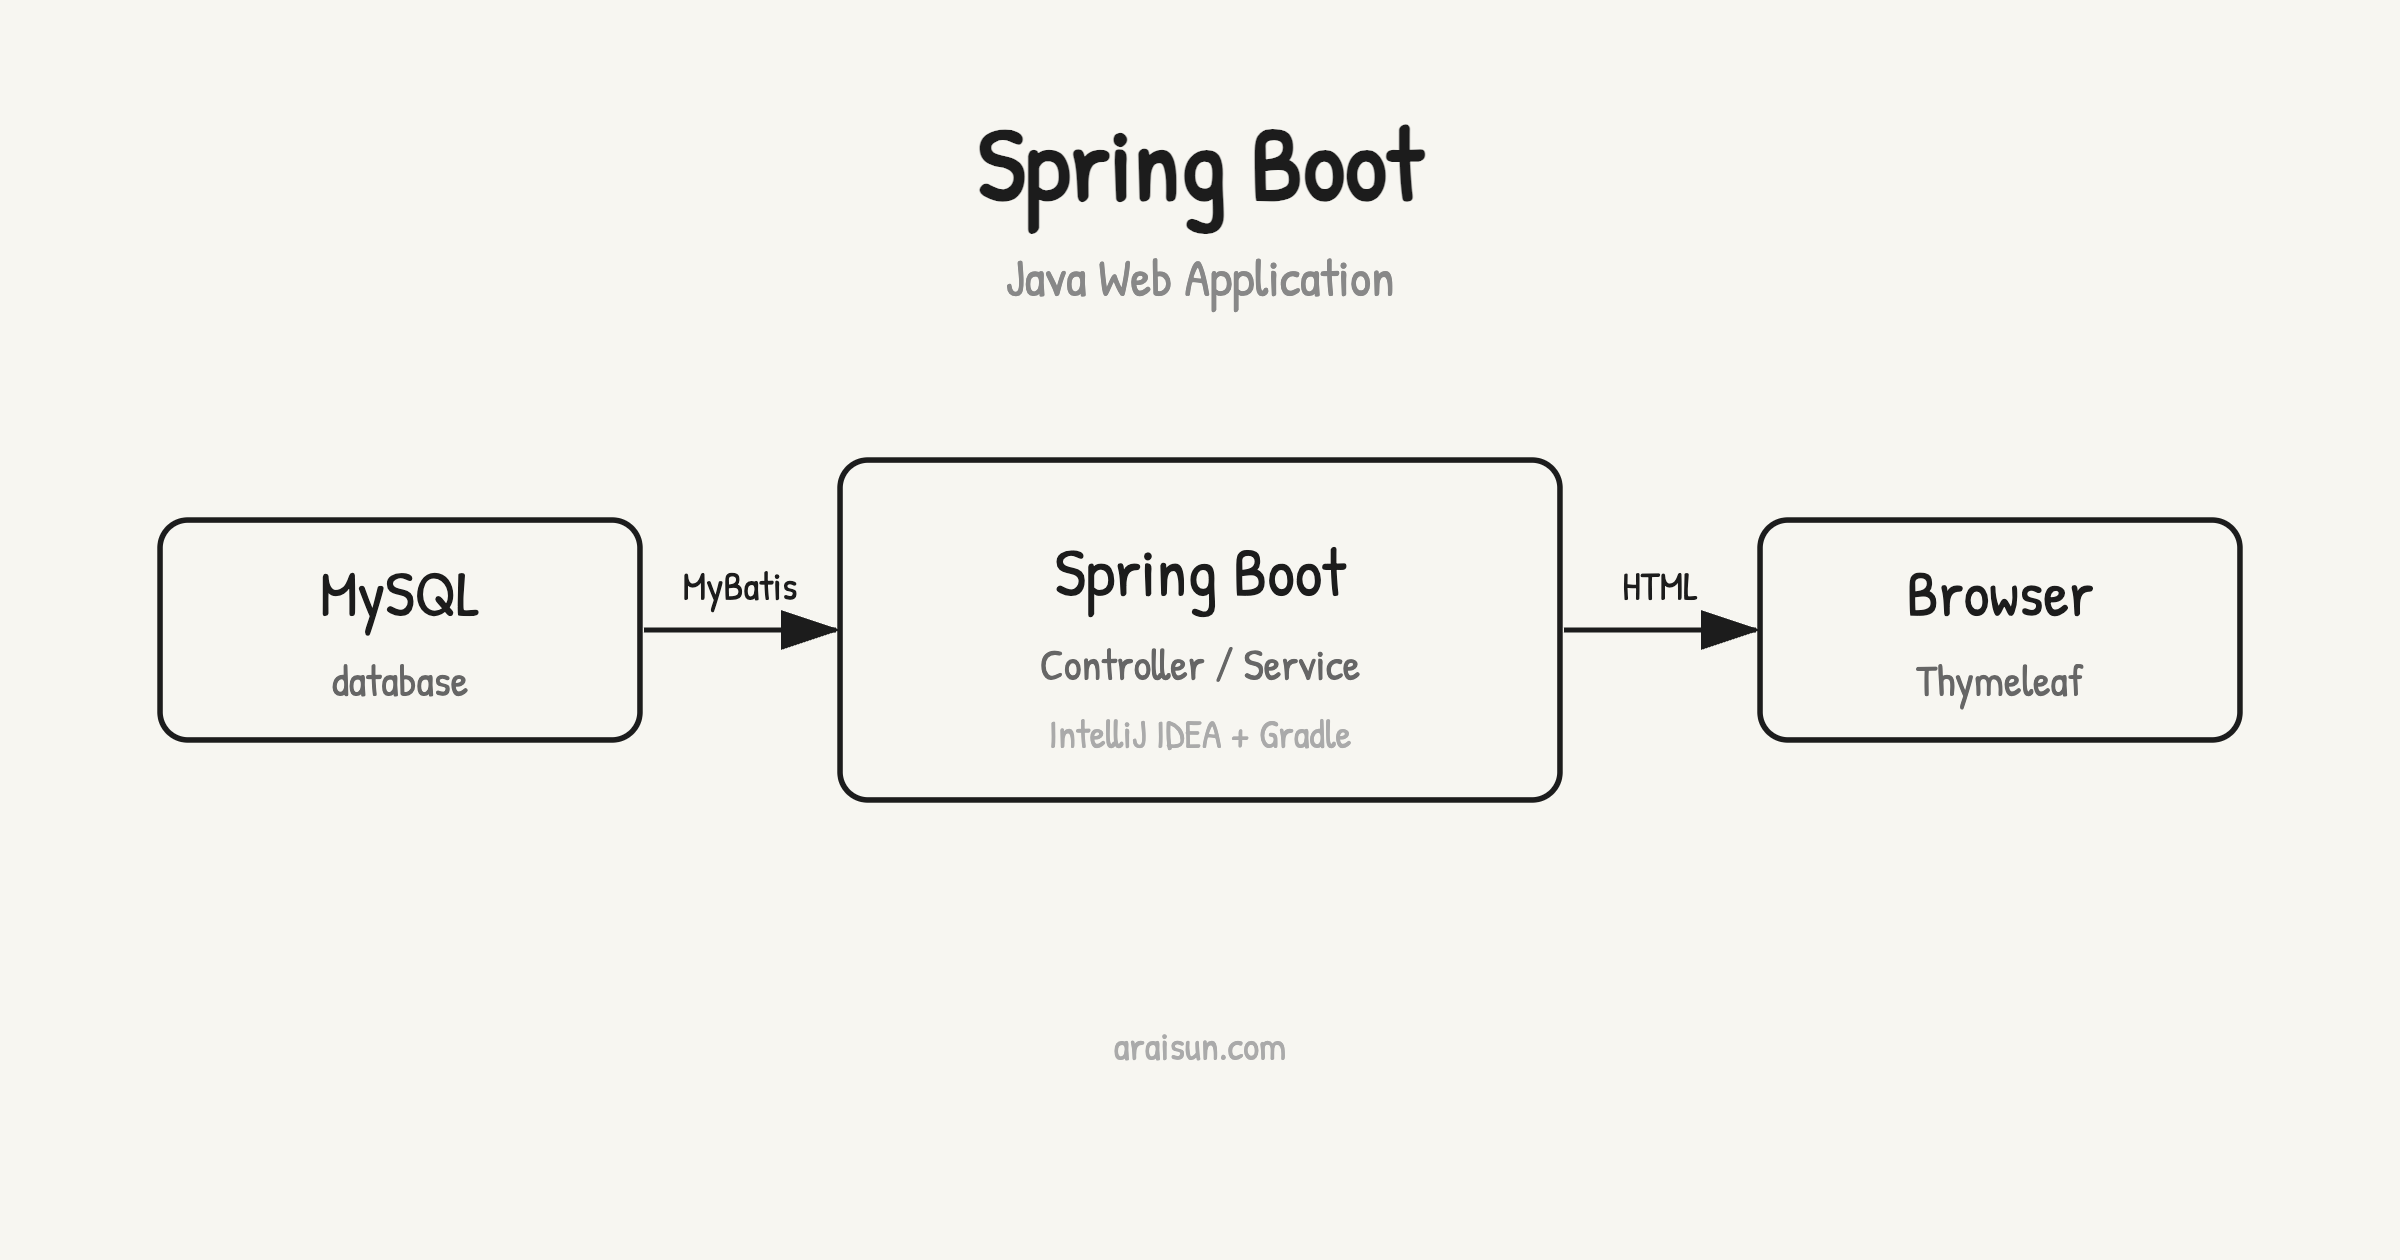
Spring Boot を使って Java の Web アプリケーションを構築する方法を解説します。仕事で Spring Boot を使うことがあったので、全体像を把握したくて学習してみました。
この記事では、IntelliJ IDEA を利用してプロジェクトを作成し、MySQL データベースとの連携、そして MyBatis を使ったデータ操作を実現します。最後に、取得したデータを Thymeleaf を使ってブラウザに表示します。
開発環境の準備
まずは IntelliJ IDEA を使って Spring Boot プロジェクトを新規作成します。
新規プロジェクトの作成
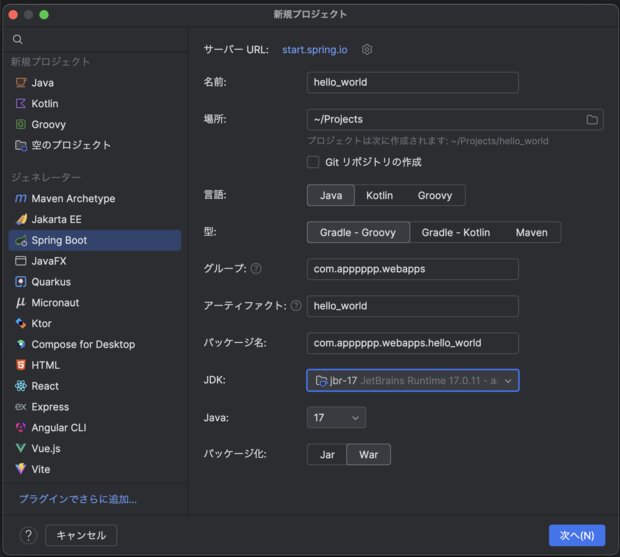
IntelliJ IDEA の「新規プロジェクト作成」から Spring Boot を選択します。
次のように設定を行います:
- 言語:Java
- ビルドシステム:Gradle Groovy
- JDK:JetBrains Runtime 17.0.11
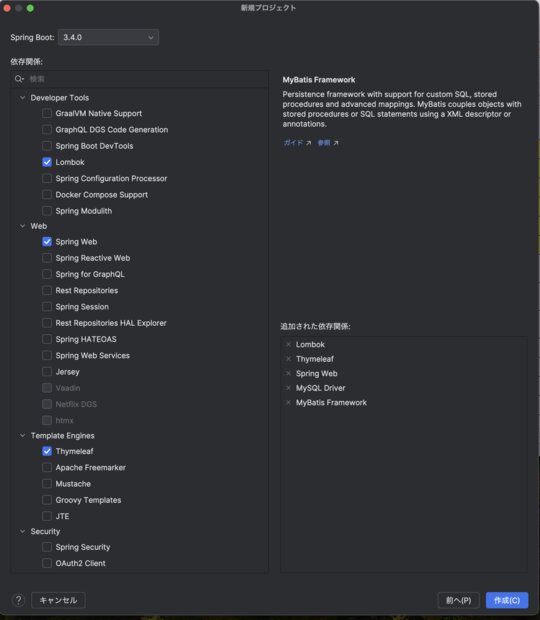
次の画面で必要なモジュールを選択します。今回は次の依存パッケージを選択しました。
- Lombok
- Spring Web
- Thymeleaf
- MyBatis Framework
- MySQL Driver
データベースの用意
次に、MySQL データベースに接続するための準備を行います。
テーブル作成
MySQL に以下のテーブルを作成しました。
CREATE DATABASE hellodb;

USE hellodb;

CREATE TABLE user (
    id INT AUTO_INCREMENT PRIMARY KEY,
    name VARCHAR(50) NOT NULL,
    created_at TIMESTAMP DEFAULT CURRENT_TIMESTAMP
);
デモデータを追加:
INSERT INTO user (name) VALUES ('Jyotaro'), ('Dio');
データが正しく登録されたことを確認します。
mysql> select * from user;
+----+---------+---------------------+
| id | name    | created_at          |
+----+---------+---------------------+
|  1 | Jyotaro | 2024-11-29 18:55:21 |
|  2 | Dio     | 2024-11-29 18:55:21 |
+----+---------+---------------------+
2 rows in set (0.00 sec)
MyBatisの設定
MyBatis の概要
MyBatis は SQL ベースのデータマッピングフレームワークです。高度なクエリや柔軟なマッピングが求められる場合に非常に適しています。
| 項目 | 説明 |
|---|---|
| SQLベース | SQL文を直接書くので、高度なクエリを必要とする場合に適しています。 |
| マッピングの柔軟性 | JavaオブジェクトとSQLの結果を柔軟にマッピングできます。 |
| XML/アノテーションでクエリ定義 | XMLやアノテーションを使ってクエリを定義可能。 |
利用に向いているケース:
- ORM(JPA)が複雑すぎる、または不要な場合。
- 高度なSQLや手動での細かい制御が必要な場合。
| ユースケース | 推奨ツール |
|---|---|
| シンプルなCRUD操作が中心 | Spring Data JPA |
| 高度なカスタムSQLが必要 | MyBatis |
| 細かい制御とパフォーマンス最適化が必要 | MyBatisまたはJDBC |
| 小規模プロジェクトで短期間開発が求められる | Spring Data JPA |
| 柔軟で複雑なデータマッピングが必要 | MyBatis |
設定ファイル編集
application.properties に以下の内容を追加します。
spring.datasource.url=jdbc:mysql://localhost:3306/your_database_name
spring.datasource.username=your_username
spring.datasource.password=your_password
spring.datasource.driver-class-name=com.mysql.cj.jdbc.Driver

spring.jpa.hibernate.ddl-auto=update
spring.jpa.show-sql=true
spring.jpa.database-platform=org.hibernate.dialect.MySQL8Dialect

mybatis.mapper-locations=classpath:mapper/*.xml
MyBatis Generator の利用
MyBatis Generator を使うと、データベースのテーブルから自動的にマッピングコードを生成できます。
依存関係
build.gradle の依存関係に以下を追加します。
dependencies {
    ...
    implementation 'org.mybatis.generator:mybatis-generator-core:1.4.1'
}
Generator設定ファイルの作成
src/main/resources/generatorConfig.xml を以下の内容で新規作成します。
<?xml version="1.0" encoding="UTF-8"?>
<!DOCTYPE generatorConfiguration PUBLIC "-//mybatis.org//DTD MyBatis Generator Configuration 1.0//EN" "http://mybatis.org/dtd/mybatis-generator-config_1_0.dtd">
<generatorConfiguration>
    <context id="DB2Tables" targetRuntime="MyBatis3">
        <jdbcConnection driverClass="com.mysql.cj.jdbc.Driver"
                        connectionURL="jdbc:mysql://localhost:3306/hellodb"
                        userId="your_username"
                        password="your_password" />

        <javaModelGenerator targetPackage="com.apppppp.webapps.hello_world.model" targetProject="./src/main/java" />
        <sqlMapGenerator targetPackage="mapper" targetProject="./src/main/resources" />
        <javaClientGenerator type="XMLMAPPER" targetPackage="com.apppppp.webapps.hello_world.mapper" targetProject="./src/main/java" />

        <table tableName="user" domainObjectName="User" />
    </context>
</generatorConfiguration>
Gradle タスク設定
build.gradle に次を追加します。
task mybatisGenerator(type: JavaExec) {
    mainClass = "org.mybatis.generator.api.ShellRunner"
    classpath = sourceSets.main.runtimeClasspath
    args = [
        "-configfile", "src/main/resources/generatorConfig.xml",
        "-overwrite"
    ]
}
次のコマンドで生成します。
./gradlew mybatisGenerator
IntelliJの場合は、下図の緑色ボタンを押せば同様に生成できます。

成功すると、プロジェクト内にMapperファイルやモデルクラスが生成されるはずです。
Web アプリの作成
コントローラの作成
src/main/java/com/apppppp/webappps/hello_world/controller/HomeController.java
package com.apppppp.webapps.hello_world.controller;

import com.apppppp.webapps.hello_world.mapper.UserMapper;
import com.apppppp.webapps.hello_world.model.User;
import com.apppppp.webapps.hello_world.model.UserExample;
import org.mybatis.spring.annotation.MapperScan;
import org.springframework.stereotype.Controller;
import org.springframework.ui.Model;
import org.springframework.web.bind.annotation.GetMapping;

import java.util.List;

@Controller
@MapperScan("com.apppppp.webapps.hello_world.mapper") // Mapperのパッケージを指定
public class HomeController {

	private final UserMapper userMapper;

	public HomeController(UserMapper userMapper) {
		this.userMapper = userMapper;
	}

	@GetMapping("/")
	public String home(Model model) {
		UserExample example = new UserExample(); // 条件なしのExample
		List<User> data = userMapper.selectByExample(example);
		model.addAttribute("data", data); // Thymeleafにデータを渡す
		return "home"; // home.htmlをレンダリング
	}
}
Thymeleafテンプレートの作成
src/main/resources/templates/home.html
<!DOCTYPE html>
<html xmlns:th="http://www.thymeleaf.org">
<head>
    <title>User Table</title>
</head>
<body>
<h1>User Table</h1>
<table>
    <thead>
    <tr>
        <th>ID</th>
        <th>Name</th>
    </tr>
    </thead>
    <tbody>
    <tr th:each="row : ${data}">
        <td th:text="${row.id}"></td>
        <td th:text="${row.name}"></td>
    </tr>
    </tbody>
</table>
</body>
</html>
動作確認
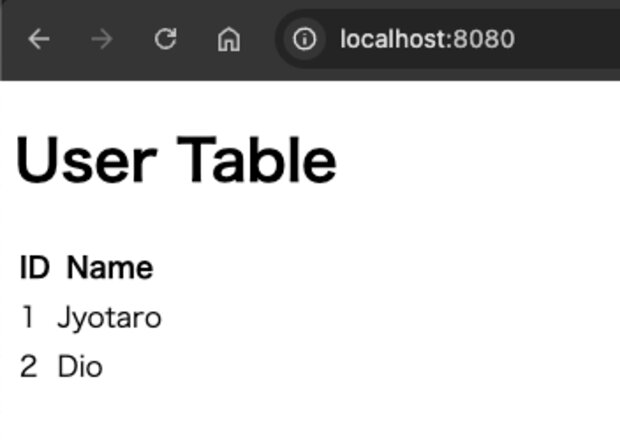
アプリケーション起動
Spring Boot を起動し、ブラウザで http://localhost:8080 にアクセスします。結果として、以下のようなデータが表示されます。
おわりに
これで、IntelliJ IDEA を使った Spring Boot アプリケーションの基本的な作成手順は終了です。この記事では、Spring Boot プロジェクト作成から MyBatis を使ったデータ操作、そして Thymeleaf でのデータ表示までを紹介しました。
これをベースに、さらに機能を拡張していくことができます。MySQL の操作をもっと深く学びたい方は「MySQLと向き合うための 現場で使えるデータベース操作・SQLノート 」も参考にしてください。また IntelliJ IDEA の使いこなしには「IntelliJ IDEA ショートカット チートシート 」と「IntelliJ IDEA の便利な設定 」もあわせてどうぞ。
関連アイテム
この記事で使った技術の学習に役立つ書籍・ツールです。