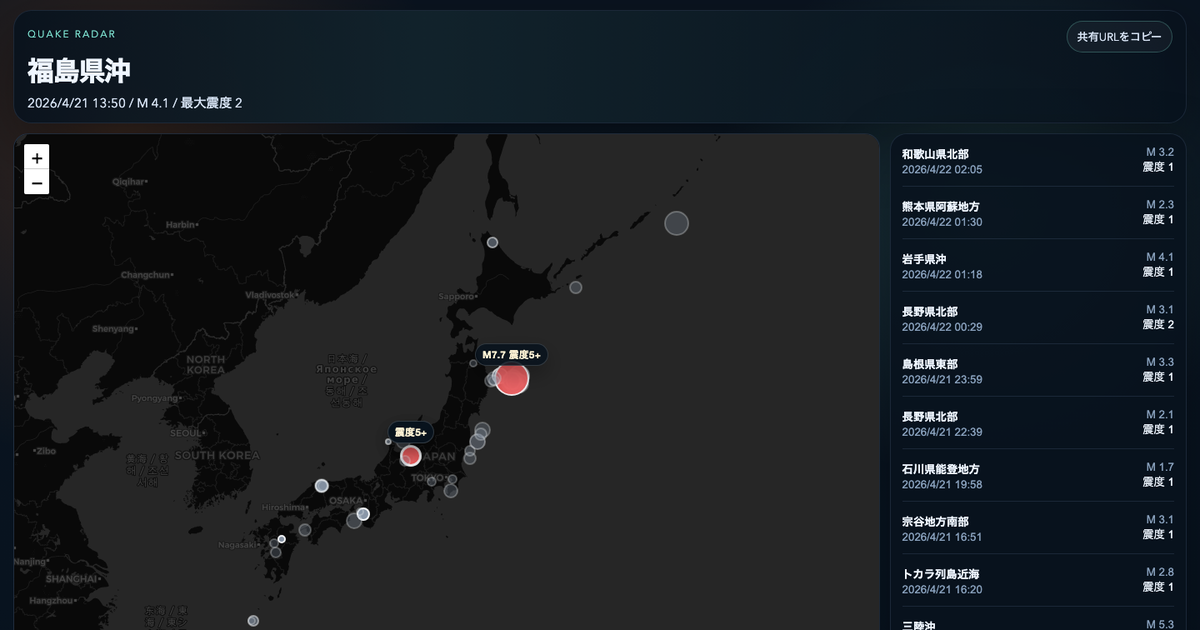
ダイソーで販売されている300円のBluetoothリモコンシャッター(Remote Shutter)を、ESP32側から BLE HIDデバイス として検出・接続し、ボタンが押されたタイミングで LED を点灯/消灯させてみました。スマホ用のシャッターリモコンを、自作IoTのトリガーとして再利用するイメージです。
この記事では、ESP32とリモコンシャッターをBLEで繋ぐ最小スケッチ、PlatformIO 側で踏みやすい arduino-esp32 のバージョン問題、そして同じ仕組みを使いやすくまとめた自作ライブラリ「BlueShutHacker」の使い方までを紹介します。ESP32でのBLE開発の流れを掴みたい方や、安価な市販Bluetoothデバイスを入力源として使い回したい方向けです。
実装にあたっては、下記の二つの記事をとても参考にさせていただきました。
https://wakwak-koba.hatenadiary.jp/entry/20181009/p1 https://lang-ship.com/blog/work/m5stickc-esp32-bluetooth-shutter-1-0-4/ 動画を再生 必要なもの 最小構成で動かす場合に用意したものは次の通りです。
ESP32 開発ボード(ESP32 DevKitC など、BLE対応のもの) ダイソーの Bluetooth リモコンシャッター(300円・ボタン電池付属) LED 1個と電流制限抵抗(330Ω 前後)、配線用ジャンパー線 PlatformIO(VS Code または CLion)または Arduino IDE ESP32 自体の最初の動作確認がまだの場合は、先に ESP32でLチカするまでの設定 で Arduino IDE からの書き込みまで通しておくと、本記事の内容に集中できます。
リモコンシャッターでLチカさせる ESP32をつかって、リモコンシャッターのボタンが押されたらLEDの点灯状態を変化させてみました。
ソースコード こちらがそのソースコードです:
#include <Arduino.h> #include "BLEDevice.h" #define LED_PIN 13 static uint16_t GATT_HID = 0x1812; //static BLEUUID GATT_HID_REPORT((uint16_t) 0x2a4d); static BLEAddress *pServerAddress = NULL; class MyAdvertisedDeviceCallbacks : public BLEAdvertisedDeviceCallbacks { void onResult(BLEAdvertisedDevice advertisedDevice) { if (advertisedDevice.haveServiceUUID() && advertisedDevice.getServiceUUID().equals(GATT_HID)) { advertisedDevice.getScan()->stop(); pServerAddress = new BLEAddress(advertisedDevice.getAddress()); Serial.print("found device:"); Serial.println(pServerAddress->toString().c_str()); // 2a:07:98:10:33:fa } } }; void updateLedState() { static boolean ledState = true; if (ledState == 0) { digitalWrite(LED_PIN, LOW); } else { digitalWrite(LED_PIN, HIGH); } ledState = !ledState; } static void notifyCallback(BLERemoteCharacteristic *pBLERemoteCharacteristic, uint8_t *pData, size_t length, bool isNotify) { Serial.println("notifyCallback"); switch (pData[0]) { case 0x01: // Volume Up Serial.println("Volume Up"); updateLedState(); break; case 0x02: // Volume Down Serial.println("Volume Down"); updateLedState(); break; } } void setup() { Serial.begin(115200); pinMode(LED_PIN, OUTPUT); digitalWrite(LED_PIN, LOW); BLEDevice::init(""); BLEScan *pBLEScan = BLEDevice::getScan(); pBLEScan->setAdvertisedDeviceCallbacks(new MyAdvertisedDeviceCallbacks()); pBLEScan->setActiveScan(true); pBLEScan->start(30); } void loop() { static boolean connected = false; if (pServerAddress != NULL && !connected) { BLEClient *pClient = BLEDevice::createClient(); pClient->connect(*pServerAddress); if(pClient->isConnected()) { Serial.println("connected"); } else { return; } //! arduino-esp32のバージョンによってはクラッシュするので注意 //! ver 2.0.2 だとここで落ちる → ver 2.0.14 または ver 3.20014.0 で動作確認済み BLERemoteService *pRemoteService = pClient->getService(GATT_HID); if (pRemoteService) { // BLERemoteCharacteristic *pRemoteCharacteristic = pRemoteService->getCharacteristic(GATT_HID_REPORT); // pRemoteCharacteristic->registerForNotify(notifyCallback); std::map<uint16_t, BLERemoteCharacteristic*>* mapCharacteristics = pRemoteService->getCharacteristicsByHandle(); for (std::map<uint16_t, BLERemoteCharacteristic*>::iterator i = mapCharacteristics->begin(); i != mapCharacteristics->end(); ++i) { Serial.print("connected to:"); Serial.println(i->second->getUUID().toString().c_str()); if (i->second->canNotify()) { Serial.println(" - Add Notify"); i->second->registerForNotify(notifyCallback); } } connected = true; } } delay(10); // 高負荷防止 } 注意点 ソースコードをアップロードするにあたって、注意点があります。PlatformIO を使う場合、arduino-esp32 のバージョンが古いとクラッシュします。ソースコード内のコメント注釈のとおり、version 2.0.2 だとダメでした。version 2.0.14 以降であれば問題なさそうです。
...