はじめに
今回は BLE通信を使って、ESP32から送られたデータをiOS端末で受信 します。ESP32をペリフェラル、iOSをセントラルとして扱い、ESP32側で読み取った値を Notify で送る構成です。
この形にしておくと、ESP32につないだセンサの値をiPhoneアプリ側で受け取り、画面に表示できます。Wi-Fiを使わずに近距離で値を渡したいときの入口として、前回のLチカ記事と合わせて読むと流れを追いやすいです。
先に要点
- ESP32側は BLE Server としてサービス、キャラクタリスティック、Notify を用意します
- iOS側は CoreBluetooth で対象サービスをスキャンし、キャラクタリスティックを見つけて通知を登録します
- 値を受け取る処理は
didUpdateValueFor characteristicで行います - UUID が一致しないと接続後に値を受け取れないので、ESP32側とiOS側で同じ値を使います
前回のおさらい
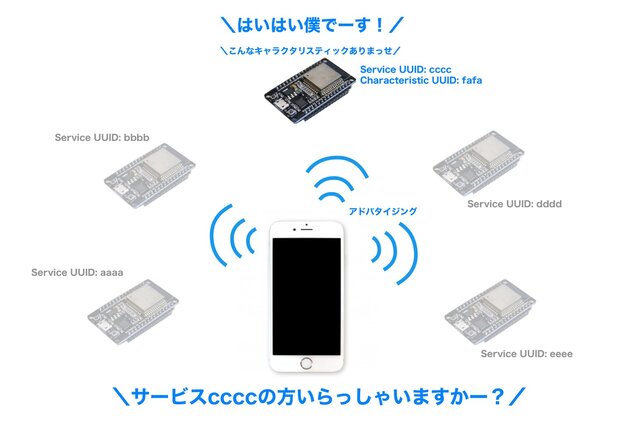
はじめに前回のおさらいです。BLE通信をはじめるには、 アドバタイジング で目的の サービス を持つ ペリフェラル を見つけ、 キャラクタリスティック を取得する必要がありました。よってペリフェラルの サービスUUIDとキャラクタリスティックUUIDの2つ以上が必要 になります。
前回は、iOSからESP32へデータを送信してLチカを実現させました。よってキャラクタリスティックの属性には Write が必要でした。 今回は、ESP32のデータをiOSで受信したいので Notify属性を使ってデータを受信 します。
ところで、この記事で扱うiOSとESP32は次のような関係になります。混乱しないよう気をつけてください。
| iOS | ESP32 |
|---|---|
| セントラル | ペリフェラル |
| マスタ | スレイブ |
| クライアント | サーバ |
ESP32のUUIDをそれぞれ次のように決めました。
| 項目 | 値 |
|---|---|
| SERVICE UUID | 4fafc201-1fb5-459e-8fcc-c5c9c331914b |
| CHARACTERISTIC UUID | beb5483e-36e1-4688-b7f5-ea07361b26a8 |
これらの値はESP32のサンプルの値を使用してます。必要あればこちらのジェネレータでUUIDを生成して書き換えてください。 https://www.uuidgenerator.net/
BLE通信でESP32のデータをiOSで受信するプログラム
概要
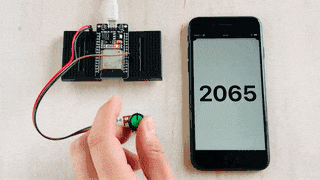 ESP32のGPIO32へ可変抵抗を取り付け、読み取ったアナログ値をiOSでBLE経由で受信する プログラムを作っていきます。
可変抵抗は両側をGNDと3.3Vに接続し、真ん中の端子をGPIOへ繋いでください。BLE通信を開始したらNotify通知を設定し、抵抗値をiOSで受け取りUILabeで表示させます。
ESP32(ペリフェラル)
ESP32(ペリフェラル)のArduinoで書いたプログラムです。前回のBluetooth Lチカとそれほど変わりません。ESP32でデータを通知するにはキャラクタリスティックにデータをセットして通知します。
pCharacteristic->setValue(str);
pCharacteristic->notify();
なお、ここでは文字列をセットしましたが、int型などもセットできるようです。
/*
 sendData2Iphone.ino
 https://araisun.com
*/
#include <BLEDevice.h>
#include <BLEUtils.h>
#include <BLEServer.h>
#define TOUCH_PIN 32

#define SERVICE_UUID        "4fafc201-1fb5-459e-8fcc-c5c9c331914b"
#define CHARACTERISTIC_UUID "beb5483e-36e1-4688-b7f5-ea07361b26a8"
BLECharacteristic* pCharacteristic;

void sendMessage(int v) {
    char str[30];
    sprintf(str, "%d", v);
    Serial.println(str);
    pCharacteristic->setValue(str);
    pCharacteristic->notify();
}

void setup() {
    Serial.begin(115200);

    pinMode(TOUCH_PIN, INPUT_PULLUP); // 内蔵抵抗でプルアップまたは10kΩの抵抗でプルアップ

    BLEDevice::init("ESP32 Bluetooth Server");
    BLEServer* pServer = BLEDevice::createServer();
    BLEService* pService = pServer->createService(SERVICE_UUID);
    pCharacteristic = pService->createCharacteristic(
        CHARACTERISTIC_UUID,
        BLECharacteristic::PROPERTY_NOTIFY
    );

    pService->start();
    BLEAdvertising* pAdvertising = BLEDevice::getAdvertising();
    pAdvertising->addServiceUUID(SERVICE_UUID);
    pAdvertising->setScanResponse(true);
    pAdvertising->setMinPreferred(0x06);  // iPhone接続の問題に役立つ
    pAdvertising->setMinPreferred(0x12);
    BLEDevice::startAdvertising();
    Serial.println("Characteristic defined! Now you can read it in your phone!");
}

void loop() {
    int val = analogRead(TOUCH_PIN);
    Serial.println(val);
    sendMessage(val);
    delay(10);
}
iOS(セントラル)
基本的には前回のLチカプログラムと変わりません。今回はNotifyですのでキャラクタリスティックが一致したら、しっかり通知登録をしてあげます。
peripheral.setNotifyValue(true, for: kRXCBCharacteristic)
すると CBPeripheralDelegate のデリゲートメソッド func peripheral(_ peripheral: CBPeripheral, didUpdateValueFor characteristic: CBCharacteristic, error: Error?) でデータを受信できるはずです。
//
//  ReciveViewController.swift
//
//  Created by araisun.com Arai on 2021/07/14.
//

import UIKit
import CoreBluetooth

class ReciveViewController: UIViewController {

    @IBOutlet weak var counterLabel:UILabel!


    let kUARTServiceUUID = "4fafc201-1fb5-459e-8fcc-c5c9c331914b" // サービス
    let kRXCharacteristicUUID = "beb5483e-36e1-4688-b7f5-ea07361b26a8" // ペリフェラルからの受信用

    var centralManager: CBCentralManager!
    var peripheral: CBPeripheral!
    var serviceUUID : CBUUID!
    var kRXCBCharacteristic: CBCharacteristic?
    var charcteristicUUIDs: [CBUUID]!


    override func viewDidLoad() {
        super.viewDidLoad()
        setup()
    }


    private func setup() {
        print("setup...")

        centralManager = CBCentralManager()
        centralManager.delegate = self as CBCentralManagerDelegate

        serviceUUID = CBUUID(string: kUARTServiceUUID)
        charcteristicUUIDs = [CBUUID(string: kRXCharacteristicUUID)]
   }

}

//MARK : - CBCentralManagerDelegate
extension ReciveViewController: CBCentralManagerDelegate {

    func centralManagerDidUpdateState(_ central: CBCentralManager) {
        print("CentralManager didUpdateState")

        switch central.state {

        //電源ONを待って、スキャンする
        case CBManagerState.poweredOn:
            let services: [CBUUID] = [serviceUUID]
            centralManager?.scanForPeripherals(withServices: services,
                                               options: nil)
        default:
            break
        }
    }

    /// ペリフェラルを発見すると呼ばれる
    func centralManager(_ central: CBCentralManager,
                        didDiscover peripheral: CBPeripheral,
                        advertisementData: [String : Any],
                        rssi RSSI: NSNumber) {

        self.peripheral = peripheral
        centralManager?.stopScan()

        //接続開始
        central.connect(peripheral, options: nil)
        print("  - centralManager didDiscover")
    }

    /// 接続されると呼ばれる
    func centralManager(_ central: CBCentralManager,
                        didConnect peripheral: CBPeripheral) {

        peripheral.delegate = self
        peripheral.discoverServices([serviceUUID])
        print("  - centralManager didConnect")
    }

    /// 切断されると呼ばれる?
    func centralManager(_ central: CBCentralManager, didDisconnectPeripheral peripheral: CBPeripheral, error: Error?) {
        print(#function)
        if error != nil {
            print(error.debugDescription)
            setup() // ペアリングのリトライ
            return
        }
    }
}

//MARK : - CBPeripheralDelegate
extension ReciveViewController: CBPeripheralDelegate {

    /// サービス発見時に呼ばれる
    func peripheral(_ peripheral: CBPeripheral,
                    didDiscoverServices error: Error?) {

        if error != nil {
            print(error.debugDescription)
            return
        }

        //キャリアクタリスティク探索開始
        if let service = peripheral.services?.first {
            print("Searching characteristic...")
            peripheral.discoverCharacteristics(charcteristicUUIDs,
                                               for: service)
        }
    }

    /// キャリアクタリスティク発見時に呼ばれる
    func peripheral(_ peripheral: CBPeripheral, didDiscoverCharacteristicsFor service: CBService, error: Error?) {

        if error != nil {
            print(error.debugDescription)
            return
        }

        print("service.characteristics.count: \(service.characteristics!.count)")
        for characteristics in service.characteristics! {
            if(characteristics.uuid == CBUUID(string: kRXCharacteristicUUID)) {
                self.kRXCBCharacteristic = characteristics
                print("kTXCBCharacteristic did discovered!")
            }
        }

        if(self.kRXCBCharacteristic != nil) {
            startReciving()
        }
        print("  - Characteristic didDiscovered")

    }

    private func startReciving() {
        guard let kRXCBCharacteristic = kRXCBCharacteristic else {
            return
        }
        peripheral.setNotifyValue(true, for: kRXCBCharacteristic)
        print("Start monitoring the message from Arduino.\n\n")
    }

    /// データ送信時に呼ばれる
    func peripheral(_ peripheral: CBPeripheral, didWriteValueFor characteristic: CBCharacteristic, error: Error?) {
        print(#function)
        if error != nil {
            print(error.debugDescription)
            return
        }
    }

    func peripheral(_ peripheral: CBPeripheral, didUpdateValueFor descriptor: CBDescriptor, error: Error?) {
        print(#function)
    }

    /// データ更新時に呼ばれる
    func peripheral(_ peripheral: CBPeripheral, didUpdateValueFor characteristic: CBCharacteristic, error: Error?) {
        print(#function)

        if error != nil {
            print(error.debugDescription)
            return
        }
        updateWithData(data: characteristic.value!)
    }

    private func updateWithData(data : Data) {
        if let dataString = String(data: data, encoding: String.Encoding.utf8) {
            print(dataString)
            counterLabel.text = dataString
        }
    }


}
今回のプログラムでツマヅイたら、前回のBluetooth Lチカをもう一度見直してみてください。プログラム中で書き換えた箇所はそれほど多くないはずです。
Bluetooth開発に役に立つツール
最後に、Bluetooth開発をする際におすすめのアプリを紹介します。こちらのアプリは、ペリフェラルのサービスやキャラクタリスティック情報をスキャンできるアプリです。UUIDなどで何かつまずいた場合に役立ちますので入れておくと便利です。